How to Use Heat Transfer Vinyl (HTV) on Cotton Shirts is an essential guide for anyone looking to personalize their apparel with creativity and flair. This versatile material allows for intricate designs and vibrant colors, making it a favorite among crafters and DIY enthusiasts alike. Through this guide, you will discover the numerous benefits of employing HTV on cotton shirts, from its durability to the ease of application, while also exploring the various types available in the market.
As you delve into the process, you will learn the necessary preparation steps, design techniques, and application methods to ensure a successful project. Each segment will equip you with the skills and knowledge to transform plain cotton shirts into stunning custom pieces that reflect your unique style.
Introduction to Heat Transfer Vinyl (HTV)
Heat transfer vinyl (HTV) is a versatile material used in the apparel industry to create custom designs and graphics on textiles. This innovative product enables users to transfer intricate designs onto various fabrics, including cotton, through the application of heat and pressure. HTV has gained popularity among crafters and commercial printers alike due to its ease of use and the professional finish it provides.Utilizing HTV on cotton shirts presents numerous benefits, making it an ideal choice for personalizing apparel.
Firstly, HTV adheres well to cotton, ensuring a durable bond that withstands multiple washes. Additionally, HTV is available in a variety of colors, finishes, and textures, allowing for immense creativity in design. The application process is relatively straightforward and can be completed using a heat press or an iron, making it accessible for both hobbyists and small businesses.
Types of Heat Transfer Vinyl
Understanding the various types of HTV available in the market is essential for selecting the right material for your project. Each type has its unique properties and applications, which are important to consider for achieving the desired outcome in your designs. The following are the main types of HTV that are widely used:
- Standard HTV: This type is the most common and is available in a wide range of colors. It is suitable for basic designs and can be applied to cotton shirts with ease.
- Glitter HTV: This variant features a sparkling finish, making it an excellent choice for designs that require a touch of glamour. Glitter HTV is often used for fashion apparel and special occasions.
- Metallic HTV: This HTV type offers a shiny, reflective finish that enhances the visual appeal of designs. It is popular in sportswear and promotional items.
- Reflective HTV: Designed for safety and visibility, reflective HTV shines when exposed to light, making it suitable for activewear and work uniforms.
- Flock HTV: With a soft, velvety texture, flock HTV adds depth to designs. This type is often used in fashion items that require a unique tactile quality.
- Patterned HTV: Featuring pre-printed designs or patterns, this HTV allows users to create stunning visuals without the need for complex cutting or layering.
The diverse range of HTV types ensures that there is an appropriate option for nearly any design or application, making it a favored choice for apparel customization.
Preparing Cotton Shirts for HTV Application
 On A T-Shirt")
To achieve the best results when applying Heat Transfer Vinyl (HTV) to cotton shirts, proper preparation is essential. This process not only ensures that the HTV adheres effectively but also prolongs the life of the design. By following a systematic approach, you can create a high-quality finished product that meets your expectations.Before starting the application of HTV, it’s crucial to gather all necessary materials.
Having everything on hand will streamline the process and minimize disruptions.
Essential Materials for HTV Application
The success of your HTV application is heavily dependent on the materials used. Below is a list of the essential items needed for this process:
- Cotton Shirt: Ensure the shirt is pre-washed and free of any chemicals or finishes.
- Heat Transfer Vinyl: Choose high-quality HTV suitable for cotton fabrics.
- Cutter or Scissors: For cutting the vinyl to the desired shape.
- Weeding Tool: To remove excess vinyl from your design.
- Heat Press or Iron: A heat press is recommended for consistent heat application, but an iron can be used as an alternative.
- Parchment Paper or Teflon Sheet: To protect the vinyl and shirt during heat application.
- Measuring Tape or Ruler: For precise placement of the design.
- Clothing Label (Optional): To indicate the care instructions for the final product.
Taking the time to ensure you have everything ready will greatly enhance your efficiency and effectiveness during the application process.
Pre-Application Steps Checklist
Following a checklist for pre-application steps can significantly improve the final outcome of your HTV application. The points below are crucial in preparing the cotton shirts:
- Wash the Shirt: Pre-wash the cotton shirt to remove any sizing or chemical finishes that might impede adhesion.
- Dry the Shirt: Use a dryer to ensure the fabric is fully dried and wrinkle-free, which aids in proper vinyl application.
- Iron the Shirt (if necessary): Remove any remaining wrinkles from the fabric before applying the design to ensure a smooth surface.
- Inspect the Fabric: Check for any stains or imperfections on the shirt, as these can affect the appearance of the final design.
- Prepare the HTV Design: Cut and weed the design ahead of time to ensure it is ready for application.
These steps are fundamental in ensuring that the HTV adheres properly and that the final product meets your expectations.
Importance of Fabric Selection and Shirt Condition
The selection of the right fabric and the condition of the shirt are paramount for achieving a successful HTV application. Cotton shirts are ideal due to their natural fibers and ability to handle heat. However, fabric quality can vary, which affects the HTV’s adherence.
“Using high-quality cotton shirts ensures better adhesion and durability of your vinyl designs.”
Before starting, confirm that the shirt is in good condition, as any flaws may detract from the final appearance. Factors to consider include:
- Fabric Weight: Heavier cotton fabrics tend to hold heat better and provide a more stable surface for HTV application.
- Fabric Blend: While pure cotton is ideal, blends can affect the adhesion of HTV; ensure the blend percentage is suitable for your chosen vinyl.
- Color and Finish: Light-colored shirts typically work best with HTV, as darker colors can show through during application.
Focusing on these aspects will lead to a more professional-looking finished product, ensuring that your HTV design stands out on the cotton shirt.
Designing Your HTV Project
 On A T-Shirt")
Creating an effective design for heat transfer vinyl (HTV) application is essential for achieving the best results when transferring your unique artwork onto cotton shirts. The design process involves several critical steps, including utilizing design software, considering the size and placement of the design, and selecting colors that enhance visibility on fabric. Understanding these elements will ensure that your final product not only looks professional but also resonates with your intended audience.When it comes to crafting a design for HTV application, using design software is a vital first step.
Programs like Adobe Illustrator, CorelDRAW, and Silhouette Studio provide tools specifically tailored for creating vector graphics, which are ideal for HTV projects. These programs allow users to create scalable designs that maintain quality irrespective of size adjustments. It’s important to create a design that is not only visually appealing but also suits the dimensions of the shirt.
Design Size and Placement Considerations
The size and placement of your design greatly influence the overall aesthetic of the shirt. An appropriately sized design ensures that it is neither overwhelming nor too subtle, contributing to the shirt’s visual balance. Here are key points to consider regarding size and placement:
- Standard placement for designs is typically centered on the chest area or slightly above, making it visible and eye-catching.
- Consider the dimensions of the shirt; for adult shirts, designs usually range from 10 to 12 inches wide, while youth sizes may require smaller designs, around 7 to 9 inches.
- Mock-ups are beneficial for visualizing how the design will look in relation to the shirt size and style. Use digital representations to get feedback before the final application.
Color Selection and Contrast
Choosing the right colors for your HTV project is crucial, as it affects both aesthetics and visibility. High contrast between the shirt color and the HTV color enhances readability and appeal. Here are some considerations when selecting colors:
- Use color theory to choose complementary colors that enhance the overall look. Complementary colors reside opposite each other on the color wheel and create vibrancy when combined.
- For darker shirts, opt for lighter HTV colors to ensure that the design stands out. Conversely, darker colors work well on lighter fabrics.
- Test the colors in real-life applications; sometimes, colors may appear different on screen compared to how they look on fabric. Always create a sample before final production.
“The right color and placement can transform a simple design into a statement piece that draws attention.”
Cutting the HTV
Cutting heat transfer vinyl (HTV) accurately is a crucial step in creating professional-looking designs for cotton shirts. Proper cutting ensures that the vinyl adheres well to the fabric and results in clean, precise edges. This section Artikels the necessary tools and settings for cutting HTV, providing detailed guidance to ensure optimal results.
Process of Cutting HTV with a Cutting Machine
To begin cutting HTV, one must utilize a cutting machine, which is essential for achieving precise shapes and designs. The process involves several steps:
1. Select the Design
First, create or select your design using cutting software compatible with your machine.
2. Mirror the Image
Since HTV is applied with the vinyl side down, it is important to mirror the image before cutting, ensuring the design appears correctly on the final product.
3. Load the HTV
Place the HTV onto the cutting mat with the shiny side down. Ensure it is aligned properly to avoid misalignment during cutting.
4. Set the Cutting Machine
Choose the appropriate material setting based on the type of HTV being used.
5. Adjust Blade Depth and Pressure
Depending on the thickness and composition of the vinyl, adjust the blade depth and cutting pressure. A typical setting for standard HTV is a blade depth of 2, with a pressure setting between 8-10.
Settings and Tools Required for Different HTV Types
Different types of HTV may require specific settings for optimal cutting. It is essential to consult the manufacturer’s guidelines for the best results. The following table Artikels common HTV types along with their recommended cutting settings:
| HTV Type | Blade Depth | Pressure | Speed |
|---|---|---|---|
| Standard HTV | 2 | 8-10 | 5 |
| Glitter HTV | 3 | 10-12 | 5 |
| Flock HTV | 3 | 10-12 | 5 |
| Reflective HTV | 2 | 8-10 | 3 |
Troubleshooting Common Cutting Issues
Cutting HTV can sometimes lead to challenges, and understanding how to troubleshoot these issues can save time and materials. Below are common problems and their solutions:
Incomplete Cuts
If the design is not fully cut through, ensure the blade is sharp and properly adjusted. Check the pressure settings and consider increasing them if necessary.
Over-Cutting
If the design is cut through the backing, reduce the blade depth. Additionally, verify the material settings are appropriate for the specific type of HTV being used.
Vinyl Not Lifting
If the HTV is not lifting from the mat, it may be due to a low blade depth. Ensure the blade is cutting cleanly through the vinyl but not through the backing.
Misaligned Cuts
To avoid misalignment, ensure the HTV is loaded straight on the mat and that the machine’s rollers are correctly positioned.
“Proper settings and maintenance of the cutting machine are essential for achieving high-quality HTV cuts.”
Weeding the HTV
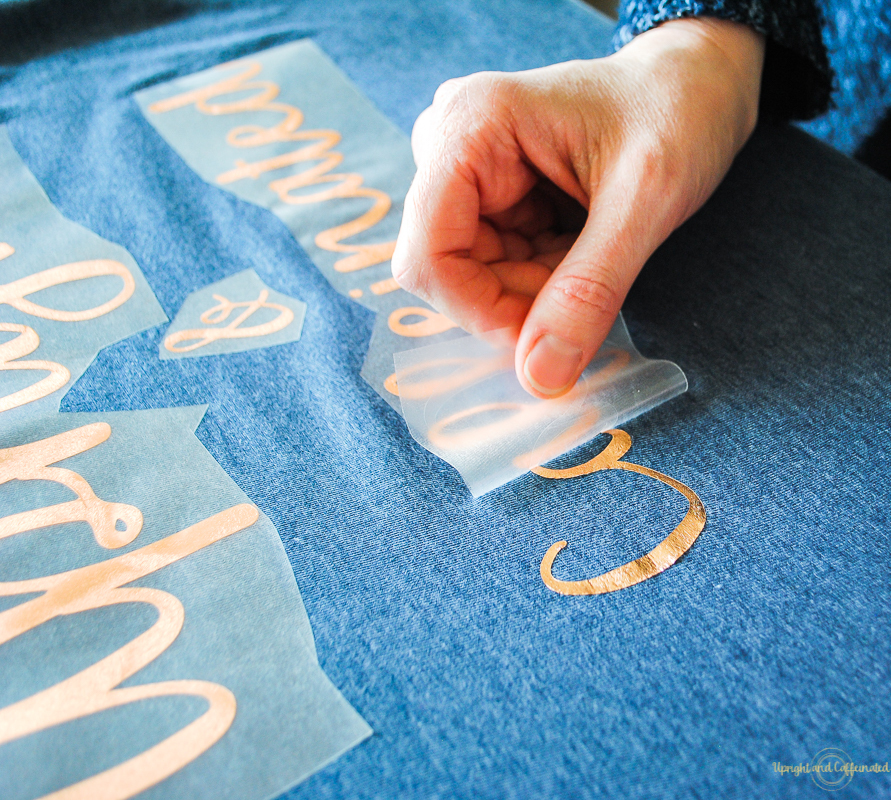
Weeding is a crucial step in the heat transfer vinyl (HTV) application process. It involves removing the excess vinyl from your design after it has been cut, allowing the intended design elements to remain intact. This step not only ensures that your project looks clean and professional, but it also prepares the vinyl for a successful transfer onto the cotton shirt.The importance of weeding cannot be overstated, as it directly influences the final appearance of your design.
Proper weeding helps avoid any unintended vinyl application, ensuring that only the desired parts of your design are transferred onto the fabric. Additionally, intricate designs require careful attention during this process to maintain their integrity.
Weeding Techniques for Intricate Designs
Effective weeding techniques are essential, particularly for detailed designs where precision is key. Here are several methods to improve your weeding process:
Start from a Corner
Begin weeding from one corner of the design, gently peeling back the vinyl. This gives you better control over the removal process, especially for small or delicate pieces.
Use a Weeding Tool
Employing a specialized weeding tool, such as a hook or a tweezers, can significantly streamline the weeding process. These tools allow for precise lifting and removal of small vinyl bits without risking damage to the design.
Utilize a Bright Light
Working under bright light helps highlight the edges of the vinyl, making it easier to see what needs to be removed. This is particularly beneficial for intricate designs where small details may be hard to distinguish.
Use Transfer Tape for Larger Designs
For larger pieces, applying transfer tape after weeding can help keep your design intact as you move it to the heat press. This technique can minimize the risk of misalignment.
Tools to Simplify the Weeding Process
Several tools can enhance your weeding experience, making the process smoother and more efficient. Here are some valuable tools to consider:
Weeding Hook
This tool is designed specifically for lifting small pieces of vinyl from the backing sheet. Its pointed tip is perfect for intricate designs.
Tweezers
A pair of fine-tipped tweezers can assist in grabbing and removing tiny pieces of vinyl that are difficult to reach.
Weeding Mats
These mats can provide a dedicated space for weeding, ensuring that your workspace is organized and that vinyl scraps are contained, making cleanup easier.
Heat Gun
A heat gun can help soften the vinyl slightly, making it easier to weed more complex designs without tearing the material.By utilizing these techniques and tools, the weeding process can be transformed into a more manageable task, ultimately contributing to the quality of your final HTV application on cotton shirts.
Heat Pressing HTV onto Cotton Shirts

Heat pressing is a critical step in the process of applying heat transfer vinyl (HTV) to cotton shirts. This method ensures that the design adheres correctly and consistently to the fabric, creating a durable and professional finish. Proper heat pressing involves understanding the right settings and techniques to achieve optimal results.Heat pressing HTV onto cotton shirts requires precise control of temperature, pressure, and time.
Prior to pressing, it is essential to prepare the shirt adequately to ensure the best adhesion. The following steps Artikel the heat pressing process, as well as key features to consider in a heat press machine.
Step-by-Step Heat Pressing Process
1. Set Up Your Heat Press
Ensure your heat press machine is clean and properly set up on a stable surface. Check that the heating element is functioning correctly and is at the desired temperature for the type of HTV being used.
2. Preheat the Heat Press
Set the temperature according to the manufacturer’s recommendations for the specific HTV. Preheat the press for about 5 minutes to ensure uniform heat distribution.
3. Prepare the Cotton Shirt
Place the cotton shirt on the heat press platen. Smooth out any wrinkles or creases, as these can affect the adhesion of the HTV.
4. Position the HTV Design
Carefully position the cut and weeded HTV design onto the shirt. Ensure that it is aligned correctly and at the desired location.
5. Cover with Teflon Sheet
Place a Teflon sheet or parchment paper over the HTV to protect it and the heat press from direct contact. This prevents any potential damage during the pressing process.
6. Heat Press the Design
Close the heat press and apply pressure for the recommended time. The pressure should be firm but not excessive to avoid damaging the fabric.
7. Remove the Heat Press
Once the time is complete, carefully lift the heat press. Allow the HTV to cool slightly before peeling off the carrier sheet. If the HTV is a cold peel type, allow it to cool completely before removing the carrier.
8. Final Pressing
For added durability, place the Teflon sheet back over the design and perform a final press for a few seconds. This step helps to secure the HTV to the fabric.
Comparison of Heat Press Machines
When selecting a heat press machine, various features should be considered to ensure it meets your needs. The following table compares different heat press machines based on their features:
| Machine Model | Type | Temperature Range | Pressure Adjustment | Size |
|---|---|---|---|---|
| PowerPress Industrial | Clamshell | 0 – 450°F | Manual | 15″ x 15″ |
| Fancierstudio Heat Press | Clamshell | 0 – 500°F | Manual | 15″ x 15″ |
| MightyPress | Swing Away | 0 – 430°F | Digital | 16″ x 20″ |
| Heat Press Nation | Auto Open | 0 – 450°F | Digital | 16″ x 20″ |
Recommended Temperature and Time Settings
Different types of HTV require specific temperature and time settings for successful application. Below are some common types of HTV and their recommended settings:
1. Standard HTV
Temperature
305°F
Time
10-15 seconds
Pressure
Medium
2. Metallic HTV
Temperature
320°F
Time
15-20 seconds
Pressure
Medium to firm
3. Glitter HTV
Temperature
320°F
Time
10-15 seconds
Pressure
Medium
4. Stretch HTV
Temperature
305°F
Time
12-15 seconds
Pressure
Medium
5. Cold Peel HTV
Temperature
320°F
Time
15-20 seconds
Pressure
Medium (peel carrier sheet after cooling)It is essential to refer to the manufacturer’s instructions for the specific HTV being used, as different brands may have slight variations in recommended settings.
Post-Application Care
Caring for cotton shirts adorned with heat transfer vinyl (HTV) designs requires specific practices to maintain the integrity and appearance of the graphics. Proper care can significantly extend the life of your shirt and preserve the vibrancy of the HTV.When it comes to washing and drying shirts with HTV, adhering to best practices is crucial to prevent damage to the design.
The longevity of HTV designs can be influenced by various factors, including washing methods, drying techniques, and the quality of the HTV material used.
Washing and Drying Guidelines
To ensure that your HTV designs remain intact and vibrant, it is essential to follow specific washing and drying guidelines. Implementing the following practices can help protect your shirts and prolong the durability of the designs:
- Turn Garments Inside Out: Always wash your cotton shirts inside out to reduce friction against the HTV design.
- Use Cold Water: Wash the shirts in cold water to prevent the HTV from peeling or cracking due to high temperatures.
- Gentle Cycle: Set your washing machine to a gentle cycle to minimize agitation, which can lead to wear and tear on the designs.
- Avoid Fabric Softener: Fabric softeners can break down the adhesive used in HTV. Opt for a mild detergent instead.
- Air Drying Recommended: Air drying is preferable to using a dryer, as high heat can damage HTV. If using a dryer, set it to a low heat setting.
Longevity Factors of HTV Designs
Several factors contribute to the longevity of heat transfer vinyl designs on cotton shirts. Understanding these elements can help you make informed decisions regarding care and maintenance.
The quality of the HTV material, the application technique, and the care regimen significantly influence the lifespan of the design.
- HTV Quality: Higher quality HTV materials generally offer better durability and resistance to wear.
- Application Method: Proper heat press settings (temperature, pressure, and time) play a vital role in ensuring that the HTV adheres correctly to the fabric.
- Frequency of Use: Regular wear can lead to faster degradation of designs. Limiting the frequency of wearing and washing can preserve the integrity of the HTV.
- Storage Conditions: Store garments in a cool, dry place away from direct sunlight to prevent fading and deterioration of the HTV.
Common Mistakes and How to Avoid Them
The application of Heat Transfer Vinyl (HTV) on cotton shirts can yield fantastic results, but there are common pitfalls that can lead to disappointing outcomes. Identifying these mistakes and implementing preventive measures can significantly enhance the quality of your final product. Understanding the importance of adhering to the manufacturer’s guidelines is crucial for achieving professional-looking designs.
Frequent Errors in HTV Application
When working with HTV, it is essential to be aware of common errors to mitigate their impact on your projects. Below are some prevalent mistakes along with suggestions for troubleshooting and prevention:
- Incorrect Temperature Settings: Using the wrong heat settings can lead to inadequate bonding of the HTV to the fabric. Always refer to the manufacturer’s recommendations for optimal temperature and adjust your heat press accordingly.
- Insufficient Pressure: Insufficient pressure during the heat-pressing process may result in poor adhesion. Ensure that you have applied an even and firm pressure, as specified by the HTV manufacturer.
- Poor Weeding Technique: Not properly weeding the vinyl can leave unwanted pieces on your design. Take your time during this step to ensure a clean cut and accurate representation of your design.
- Using the Wrong Type of Vinyl: Different types of HTV are designed for various fabrics. Always select the appropriate vinyl for cotton materials to ensure compatibility and durability.
- Incorrect Alignment: Misalignment of your design can lead to an unprofessional appearance. Use templates or guides to ensure that your HTV is positioned accurately before pressing.
Preventive Measures for Quality Enhancement
To ensure the best possible outcome when applying HTV to cotton shirts, consider the following preventive measures:
- Conduct a Test Press: Before starting your actual project, conduct a test press on a scrap piece of fabric to determine the ideal temperature and pressure settings.
- Keep Your Tools Clean: Regularly clean your cutting mats, blades, and heat press to avoid any residue that may affect the quality of your cuts and presses.
- Read Manufacturer’s Instructions: Each HTV product may have specific requirements. Thoroughly read and follow the manufacturer’s guidelines to ensure proper application.
- Monitor Time and Temperature: Use a timer to ensure that you are applying heat for the correct duration. Over- or under-pressing can compromise adhesion.
- Store HTV Properly: Protect your HTV from extreme temperatures and direct sunlight when storing to preserve its quality for future projects.
Adhering strictly to manufacturer specifications is essential for achieving optimal results when working with HTV.
Creative Project Ideas Using HTV
 On A T-Shirt")
Heat Transfer Vinyl (HTV) opens up a world of creative possibilities for customizing cotton shirts. Whether for personal expression, special events, or promotional items, HTV can transform an ordinary shirt into a canvas for artistic and meaningful designs. The versatility of HTV allows for a range of styles, from elegant and sophisticated to fun and playful, catering to various themes and occasions.One of the key aspects of utilizing HTV effectively is understanding the types of projects that can be executed.
Here are a few creative project ideas that exemplify how HTV can enhance cotton shirts:
Themed Event Designs
Creating themed designs for shirts can significantly contribute to the overall ambiance of an event. Below are examples of themes and corresponding design ideas:
- Birthday Celebrations: Custom shirts featuring the birthday person’s name and age, adorned with fun graphics like balloons or cakes.
- Family Reunions: Matching shirts for family members displaying a family name or a clever slogan that represents the family’s heritage.
- Bridal Parties: Coordinated shirts for bridesmaids and groomsmen, showcasing roles (e.g., “Maid of Honor”) or wedding date.
- Sports Events: Personalized jerseys with player names and numbers, or team slogans, perfect for group outings or competitions.
- Seasonal Celebrations: Festive designs for holidays like Christmas or Halloween, featuring themed graphics and catchy phrases.
Customizing HTV Projects for Gifts
Personalized gifts enhance the sentiment behind any occasion. Custom T-shirts made with HTV can be an ideal gift choice. Below are tips for customizing HTV projects to make thoughtful presents:
- Consider the Recipient’s Interests: Incorporate hobbies, favorite quotes, or symbols that resonate with the person receiving the gift.
- Use Meaningful Text: Select phrases or lyrics that hold significance, adding a personal touch to the design.
- Incorporate Unique Graphics: Utilize custom graphics that reflect shared memories, like a location map or an inside joke.
- Experiment with Colors: Choose color schemes that align with the recipient’s preferences or favorite shades to create a visually pleasing design.
- Include a Personal Note: Pair the T-shirt with a heartfelt note explaining the design choice, enhancing the emotional value of the gift.
Promotional Items Using HTV
For businesses and organizations, HTV can be an effective means of marketing through customized shirts. Here are some strategies for creating promotional items:
- Branding: Design shirts that prominently feature the company logo and tagline, increasing brand visibility at events or in the community.
- Event Merchandise: Create limited edition shirts for specific events or campaigns, encouraging attendees to purchase as memorabilia.
- Community Involvement: Produce shirts that support local causes or initiatives, showcasing a commitment to social responsibility.
- Employee Appreciation: Design custom shirts for employees, fostering team spirit and creating a sense of belonging within the company.
- Seasonal Promotions: Develop special designs that align with holidays or seasonal sales, capturing consumer interest and encouraging purchases.
Epilogue
In conclusion, mastering the art of using Heat Transfer Vinyl (HTV) on cotton shirts opens up a world of creative possibilities for personal expression and gifting. By following the Artikeld steps—from preparation to application and care—you will not only enhance your crafting skills but also ensure that your designs remain vibrant and long-lasting. Embrace the joy of creating with HTV and make your cotton shirts a canvas for your imagination.